Wednesday, 31 August 2016

Seamless Jumper

So I finally finished my seamless jumper - converted from a standard pieced pattern - and I LOVE it. It was a bit of a headache at times but really worth all the effort in the end.


As I have mentioned before, I really prefer to knit seamless patterns because I always make such a mess of sewing them up. So when I found this lovely (and free) jumper pattern by Becky Wolf I thought I would have a go at converting it to a seamless pattern.
I have written an extensive list of things I did to alter the pattern on the Ravelry and I'm not going to bore everyone here by repeating it. I knit the sleeves first up, using the ,magic loop method, to the armhole. They have a really nice interesting lace motif on them and went together treacly quickly. 

Initially the main body was a simple as casting on all the stitches for the front and back and working in the round. I used markers at the side seams to help with knowing where to put all the shaping and it worked really well. Putting the sleeves into the body was a little tricker and for awhile there were so many stitches! However, the raglan shaping soon sorted that out. The main headache was trying to sort out the short rows for the neck shaping but after a few attempts (and chats with my Mum) we got there!

I'm so pleased with the outcome of this jumper. The wool, Drops Belle, is a cotton linen mix and so lovely to knit with. I really like the navy colour for a change too. I'm looking forward to some cooler weather so that I can get some wear out of it now!!!!


Monday, 29 August 2016

Bank Holiday Sewing Projects

This Bank holiday weekend, we were at a friends lovely wedding so sewing projects were on hold until Sunday afternoon! 

I have been working on a super exciting unselfish sewing project which is nearly finished so hopefully some pictures soon. However, whilst I am enjoying the project immensely it doesn't need my new shiny overlocker. Luckily, my friend Jo gave me some beautiful Batik fabric she picked up in Indonesia and I thought it would be perfect to have another go at a Colette Laurel pattern - using the overlocker too!


I made the top almost exactly as the Lacey version, however, this time I cut the back out in two pieces so that I could shape the top of the neck in to remove the excess material that caused some gaping in the previous version.

Colette Laurel

The sleeves were not as easy to ease into the armhole in the stiffer fabric and I couldn't complete remove all the pleats from the gathering. I also learnt after the first sleeve it is better to use a normal sewing machine to insert the sleeve then overlock the edges to finish it off.

Colette LaurelColette Laurel

Really love the fabric and it has made a nice summer/autumn top although I am still learning with the overlocker so it isn't as neat as the lacey version.

Still a fun bank holiday project! Also managed to finish my seamless knit top this weekend post about this soon.


Thursday, 25 August 2016

First Overlocker Project - Briar T-shirt

After a lot of deliberating, today I finally took the leap to owning my first overlocker! 

Even though I do a lot of sewing with jersey fabrics I haven't been sure how much use I would get out of one. I was also worried about how difficult they would be to use so it has taken me a while before finally deciding to go for it. With it being the bank holiday weekend I thought it was a good opportunity to have loads of time to play with it too.
Brother 1034D overlocker


I went to Crafty Sew and So in Leicester because when I had been in their previously they had been really friendly and helpful and supporting local business is really important to me - especially sewing ones. Before buying the machine the shop were really helpful in answering all my questions and showing me how to get started. They also offer a free 20 minute "how to use the overlocker" demonstration which is super useful too!


I did quite a lot of reading about different overlockers before choosing the brother 1034D. Mostly because it isn't very expensive but has a nifty threading mechanism to make it easier to get started - more expensive ones have automatic threaders. It also came with a range of different feet and adjustable feed pressure - two things that I really wanted given the type of sewing I mainly do. 

overlocked Jersey


The overlocker comes out of the box with some white thread to try it out with, so after reading the book from cover to cover I thought I'd give it a go with some scrap jersey fabric - wooohoooo it goes so much faster than an ordinary machine!! 

For my first project I bought some cheap fabric from the "jersey man" on Leicester market - it's a great place for cheap bits mostly of jersey this piece I bought for £1 and it is enough to make a Megan Nielsen Briar T-shirt - so here goes!

overlocked seam


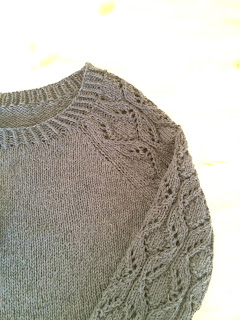
The overlocker produced really neat shoulder seams although I went back to my regular machine to attach the neck band, I might finish the edge of the neck band with overlocking first next time to neaten it up. 
inserting a shoulder with overlocker


Putting the sleeves in was a little tricky as controlling the speed was necessary to stop any puckering and I had to remember to take the pins out far enough in advance. 


I trimmed off about 2.5 inches before hemming the t-shirt. I overlocked the raw edge before using a twin needle on my ordinary machine to make a nice neat edge. Excuse the picture as I only had white thread for the overlocker so it looks a bit messy but the finish is really neat!


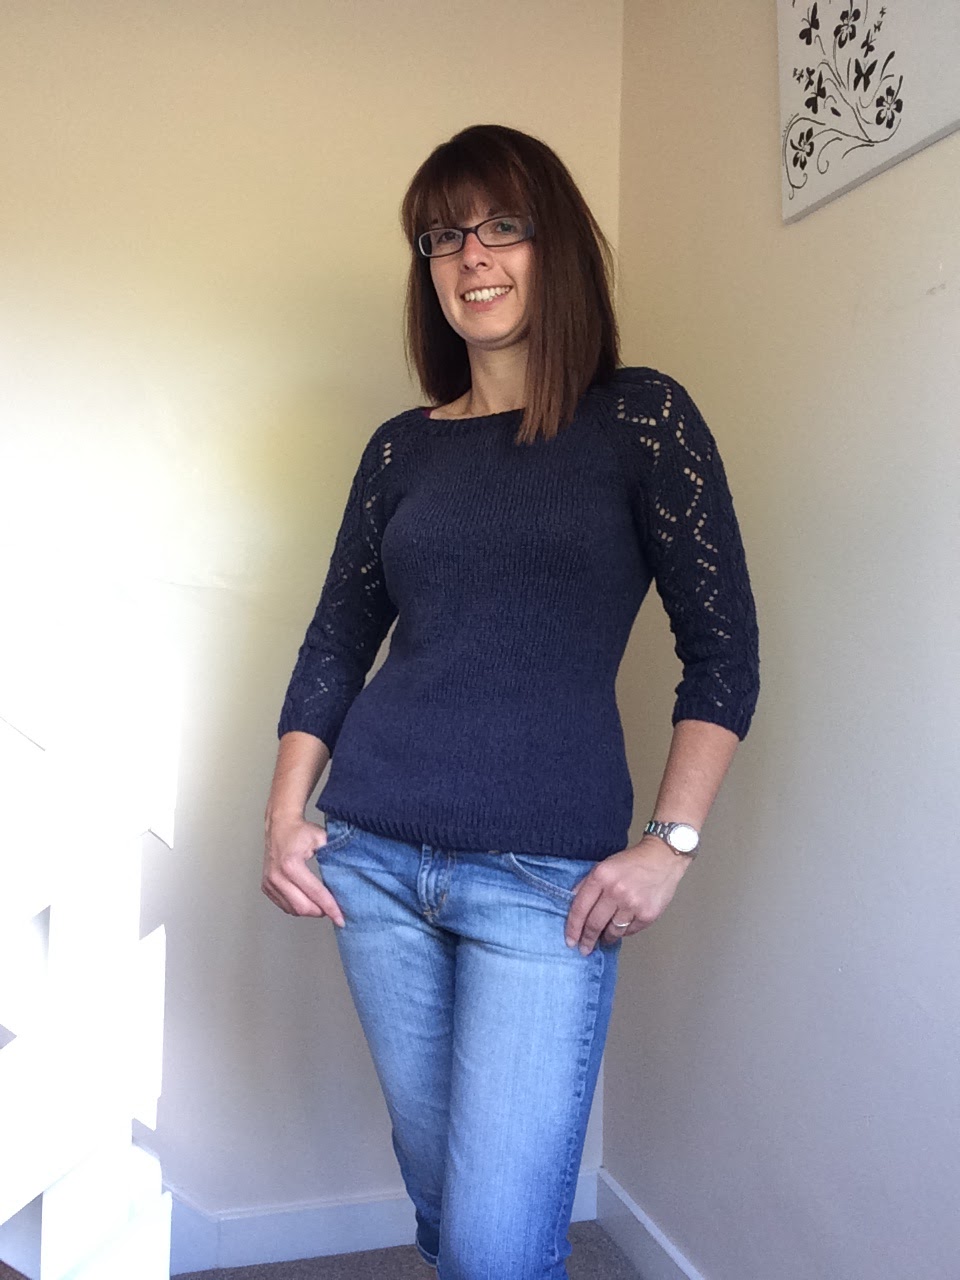
 And finished - my first project on the overlocker!

Briar T-shirt

Just to add - I LOVE this pattern!! I really didn't think I would like the loose fitting T-shirt style but I have made several of them while it has been warm (and now they are even easier with the overlocker). I really like both the long and shorter views and I already have some thicker jersey and knit fabrics to try the longer sleeved version as a jumper.

Briar T-shirtBriar T-shirt


Tuesday, 23 August 2016

Vintage Shirt Dress

It has been really hot today, even in our air conditioned office so even I couldn't out on jeans the morning. Instead I wore my Sew Over It Vintage Wrap dress.

I made this dress a few months ago now and it hasn't had a lot of wear despite how well it turned out.

The reason this dress came about was due to a colleague of mine bringing back about 2 meters of this gorgeous paisley print fabric when he went home to visit his parents in India. It's so soft and feels and sews amazingly. Anyway it took me a while to find the perfect pattern for the fabric but I decided that it's weight would make a good shirt dress.

The dress is made in a lot of pieces so it took a couple of days to complete. Especially as I wanted to be really careful to do a good job with the lovely fabric! I even made my own covered buttons to match.


The pattern was not to difficult but there were definitely some fiddly bits - like fitting the collar and the facing and then trying to persuade them to lie flat. That took a lot of pressing.  This is not the first sew over it pattern I have tried and I really like them they have good clear instructions and there are lots of possibilities to make it your own. I never agree with finishing the edges of the material first though - I trimmed and "overlocked" after I was happy with the fit. I also ignored the button placement guide and went with what I felt looked best and  to avoid any weird pulling. I did add a snap faster at the point wear the bodice joins the skirt to prevent any unwanted gaping that is quite common with shirt dresses. I also didn't interface all the way down the front - partly because I didn't have enough and partly because the ,material was already quite stiff I just put small squares of it where the buttons and button holes are.

 Although it hasn't had a lot of wear I do like how this dress finished up and it works with long sleeved t-shirts underneath as well as sleeveless on hot hot days like today. I think I'm just not a dress person most of the time!

Saturday, 20 August 2016

Lacey Laurel Top

I recently went to Birmingham with my Mum and bought this lovely cotton lace fabric from one of the market stalls. I thought it would make a really nice over fabric for a double layered top so I also picked up some cream coloured cotton lining - the whole lot only cost £4 so I was pretty pleased with it.

The pattern I chose to make the top in was the Colette Laurel top as I really like boxy tops with darts in the back to give a bit of shape. Although I nearly changed my mind when I saw the price of the pattern! Hopefully I will get lots of use out of it making the different variations.

I cut the back and front pieces out of both fabrics. I actually cut the back out on the fold as well taking out the seam allowance as I didn't want a balky back seam through all the fabric layers. The sleeves I lengthend by 3 inches before cutting out only in the lace material.


Once cut out I layered the lace pieces on top of the lining material and tacked the pieces together around the outside. This also acted as my stay stitching for the neck edge. I was then able to start following the pattern instructions for view 4. I transferred all pattern markings to the lining material rather than the lace as it was easier to see that way and the lace was a bit more stretchy so more likely to move as I was marking. 

The darts for both front and back were sewn through all the layers of fabric which required a bit of pressing to get them to sit nicely. 


After sewing the seams I trimmed them down and "overlocked" the edges using the machines overlocking foot to get the zigzag stitch to neatly line up of the edge. I'm really pleased with how this finishes off the edges in woven fabrics although I might eventually invest in an actual overlocker that will do it properly. 


The neck edge I bound using bias binding made from the lining fabric and my favourite neck binding method. I thought about binding the sleeve cuffs to but in the end just did a double turned hem on the lace which works well and matches the hem at the bottom of the top. 

Colette Laurel Top

Very pleased with how the top has turned out and can definitely see me making some more using this pattern. It wasn't a difficult pattern to follow and even with the faff of using double layers it only took me  couple of hours from cutting out to putting on - although it will probably be off again and in the wash quicker than that as white is not a sensible choice with a lively muddy Rottweiler about!

"Who? Me?!"


Friday, 19 August 2016

My favourite edge binding method for tops

I know it is mostly just bias binding but whilst I was making my Laurel top I thought it would be fun to take some pictures of the neck binding method that I use for a lot of my tops and post them here. I use this method on light-weight fabrics instead of bias binding the neck or putting in a large facing that often needs tacking down and gets in the way of ironing.

First I make some bias strips by cutting a few ( approximately 1.5 inch wide) strips of fabric diagonally so the stretch is across the width of each strip. When making quilts I would do continuous strip binding - there's a good tutorial on this by So Sew Easy - but as you don't need that much for tops it seems like a lot of hassle. 

The strips are then placed at right angles to each other and sewn together diagonally (along the black line). Once the seam is trimmed the pieces open up into a nice long strip of bias binding.


You can just use this strip as 'normal' bias binding but for this method I like to iron the strip in half wrong sides together. Then attach the binding to the right side of the neck edge (or any other edge you want to bind - it works pretty well for sleeves too) with the raw edge matching the raw edge of the top. I then stitch an appropriate seam allowance - usually 1/4 inch.


Once attached, I usually trim the seam allowance before pressing the whole lot onto the wrong side of the neck edge. You can then either top stitch it down or hand stitch if you don't want a line of stitching on the right side of the top. 

Voila - bound edge!


SaveSave

Wednesday, 17 August 2016

Seamless knits

I really enjoy knitting jumpers but I have always been really bad at sewing them up afterwards so now I am a little obsessed with seamless knitting, I am even trying to convert a pieced jumper pattern into a seamless one - blog post to follow if successful!! 

Here are a selection of the seamless projects I have completed so far.

Talia waistcoat

This was my first experience of seamless knitting and I love this jumper. I can't wait for the autumn to start wearing it again. The pattern is available for free from Ravelry and it is really easy and flattering knit. I made mine in an aran weight wool blend but it would work in cottons too. It comes up slightly short so if you like longer sweaters definitely add a few inches to the bottom. You knit the sweater from the bottom up and it includes the button bands so no picking up stitches along the front edge to add to the neatness. 

Baileys Irish Cream

I fell in love with this pattern when I saw it on Ravelry - so much so that I even paid for it, I usually look for the free patterns! It is designed by Thea Coleman and published in Baby Cocktails. The sleeves are knit first and then added to the body at the arm holes. There are a lot of stitches at this point but the raglan decreasing soon sorts that out! I chose a DK 100% cotton in cream from Patons to make this sweater and it has come out quite heavy almost jacket like but I still love wearing it with jeans. The lace pattern at the front is really simple but looks lovely when blocked - this is the first pattern I have bothered to block and will always do so in future it makes a real difference. Because the sleeves are knit in the round from cuff upwards its easy to alter the increasing to suit your arms to get the fit exactly right - I just kept trying it on as I went and did the increases as needed. I would do the button holes differently next time as they are too loose to keep in closed, however, I don't usually wear cardigans done up so the buttons are more decorative than anything.

Allegra

This was fun cardigan to knit although it isn't truly seamless, it is worked in one piece so there is no joining in of sleeves which is usually my biggest weak spot! The wool I used was a DK cotton from Drops design. The wool splits a bit as you use it but it is still a go-to yarn for a lot of my projects (you'll see if you continue to read!) The pattern is free by Margaret Willson and very simple to follow. Basically you cast on at the right sleeve, increase to the under arm, cast on for the from and back, do some casting off to make the front opening and then reverse for the other side. The only headache for me was working out the decreases on the left sleeve so that it matched the right - I'm sure if I had just followed the pattern exactly it would have worked out but I couldn't see it in my mind so did some complicated doodling! Turned out OK in the end, although some days I feel like the roman stitch on the sleeves makes me feel like a hedgehog - on those crazy days it just goes back in the cupboard.

Sweet as Candy

An actual Drops design pattern to use Drops wool - the beautiful and super soft 100% wool, Karisma DK. It was my first attempt at colour work and I really enjoyed the adventure apart from weaving in all the ends afterwards. Keeping the tension right in the yoke took a bit of adjusting as this was my first colour work project and at first I was pulling the wool too tight. However, I am really pleased with final result and finished garment came out at a nice weight for a short sleeved cardigan to wear over long sleeved tops. I did modify the button band to a moss stitch rather than garter stitch and used the tulip buttonhole method to make really neat fitting holes I even found some colourful buttons to match the colours in the cardigan in my stash!

Crocheted Cardigan

I have crocheted several blankets and flat pieces however a cardigan was not something I had thought to try. This pattern was another Ravelry find by Milobo although the link to the pattern doesn't work anymore she gave instructions for making it in a small size that you can the modify to make it bigger or smaller I guess. Since the pattern is worked from the top down you can also keep trying it on over your shoulders until you get the desired effect. I made this in some more Drops design DK cotton light although the splitting of the strands did make crocheting slightly more challenging than knitting with the wool I still really like this wool. The cardigan is worked in double and single crochets you just have to be careful when turning for each row that you don't work an extra stitch and therefore inadvertently increase each row (personal experience!) I like the effect of the jacket and I enjoyed crocheting it rather than knitting for a change - I have another pattern to try on my project pile now.


.

Tuesday, 16 August 2016

Keyhole blouse

This is a simple sew pattern that I have remade several times making modifications each time.


The pattern has two views - one with a pleated front that I have yet to try. Both have a V-shape at the front and in the original version a bias bound neck that "closes the hole" to make a keyhole effect.

It's another easy to follow, minimal instruction simple sew pattern that came free with love sewing magazine.

I originally made it in the cream fabric with swallows on from sew over it exactly as the pattern said with the the bound neckline. I like how the blouse turned out but, with the neck binding, the shoulders are pulled in making it slightly narrow across my back.

Take two: 

For this version I used a fairly heavy weight linen effect fabric that's pretty stiff. I altered the pattern to give a bit more room across my shoulders. I also cut a front and neck facing to finish the neck edges off. I strolled a bit with the front V and actually ended put with a pleat in the front but I actually don't mind that too much. I took out the back pleat when I cut out the pattern as I thought that otherwise I would end up with far to much fabric in the finished top. For this version I chose 3/4 length sleeves and actually spent ages working out how to make it look like turned back cuffs - It involved a lot of backwards and forwards folding! for this version I used my new "overlock foot" to finish of the edges with a zigzag stitch. I love this foot for heavy weight fabrics it finished the seams so nicely. 


Take three:

This fabric is a super super light weight drapey viscose rayon fabric from Dragonfly fabrics with flamingoes on! I absolutely love the print although sometimes I wonder if it looks a bit too much like PJ fabric. This version is similar to version 2 except I tried to make the back more like a shirt by adding a shoulder section and then transferring the pleat to the bottom half - I think it works OK although I didn't think about the size of the top yoke bit and think it maybe should be a bit smaller? The neck edge this time I used bias binding that I folded in and top stitched down, this is my new favourite way of finishing edges especially in light weight fray-able fabric.

Take Four: 


This I think this is my favourite version. The fabric I bought in Hellerslea fabrics in Newport, whilst on holiday on the Isle of Wight. It's a viscose cotton with loads of drape and I absolutely love this shirt. The construction was pretty much exactly as take 3 but better because I knew where I was going with it rather than trying things out and unpicking loads. Also I used french seams to give the inside of the top a cleaner finish. Something I do a lot now with light weight fabrics.


Take five: 

This is a hybrid between the bias cut top  the latest sewing bee book "Stitch to Style" which I have made several times as a written but I wanted to use this material to make a long sleeved top. Since I really like the chevron effect when you cut stripes on the bias I used the pattern pieces from the bias cut top in the sewing bee book - there's a great tutorial from the thrifty stitcher for cutting the top to get the chevrons right - as a guide but adapted the shaping of the armholes so that I could use the keyhole patterns sleeves. I didn't think that a V-neck would work too well with the chevron effect so stuck with a scooped neck at the front. I used french seams and my favourite neck binding method as the material was another lightweight drapey viscose, this time from material magic in Leicester. The top is exactly how I imagined and I love wearing it tucked in to jeans with boots - not ideal for the current summery weather but I'm sure I'll get lots more wear out of it in the next few autumn months.